Showing posts with label Anatomy of a Goal. Show all posts

Wednesday, April 21, 2010

Anatomy of a Goal: Out Hawking the Hawks

If I say to you that a long bomb pass through an open neutral zone results in a game winning goal, would you expect that the shooter was Chicago's Patrick Kane, or Nashville's David Legwand.  Well, Section303.com reset the Legwand 'Meter, so it must be the latter!

This goal is a great example of  a lightening fast transition game by Nashville, and a defense by Chicago  that does not play a Nashville style "Trap".  Its a much better, and differing picture, than game 2's long bombs.  The result, a two-on-one breakaway and a Legwand game-winning goal.

Want to see Chicago's reaction to the game, click here.

The Video

The Breakdown

The play is in the Preds' defensive zone.  Notice first the excellent positioning by the Predators.  Every player is exactly where they need to be.

1.  LW Smithson collects the puck along the boards.  He is going to move toward the net away from the pressure, and collect the puck.  Chicago does not keep up the forecheck, but instead accepts the turnover and starts to transition back to defense.  LW Smithson will make the cross ice pass once the pressure lets up.

2.  Well, Chicago may start to transition, but C Legwand and RW Sullivan bust it down ice.  This aggressive play was not typical of Legwand's line during the regular season, but I'm glad to see it.


3.  The D Man (I think its Weber, but Its hard to tell from the Video: EDIT, its Klien, thanks to Shlimmy for pointing that out.) makes a great pass under amazing pressure from Chicago.  The pass is definitely of the long bomb variety.


4.  Here is another view of the pass.  Again, notice the pressure on the Preds' D.  Notice also how much open ice there is.  This is not a picture you saw very often last night, when the Preds were on defense.  The Preds did such a wonderful job of clogging the neutral zone.


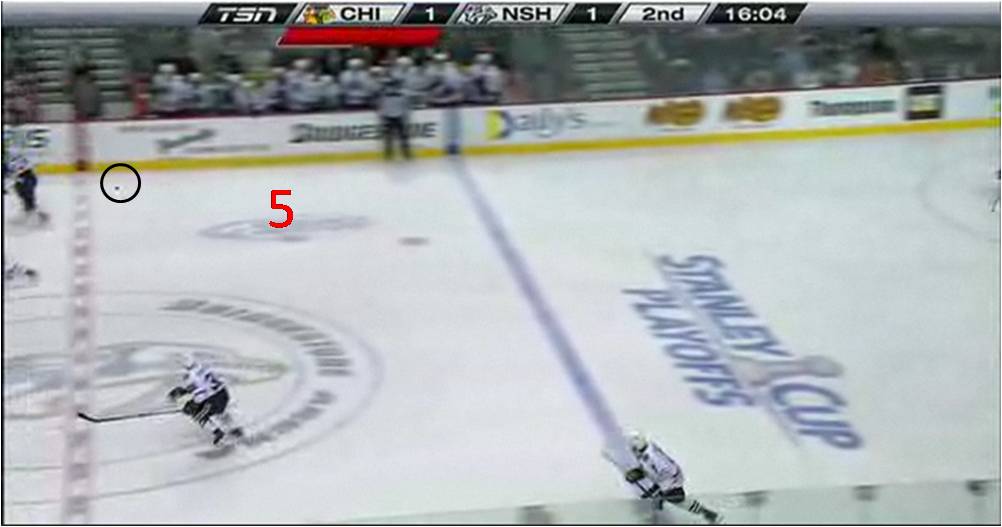
5.  The great thing about this pass is that it catches up to Sullivan, who is skating full speed.  Also, the pass is banked off of the boards, before it gets to Sullivan, so that the odds of it getting turned over are far less.  [The football comparison here is a QB putting a football on a WR's, say, outside shoulder, if the defending CB is on his inside shoulder.]

6.  Sullivan has half a step on the Chicago defender.  He does not quite have the puck in a shooting position, though, so a pass to Legwand makes perfect sense.  Notice that if the Chicago defender chasing Legwand is one or two steps closer to the play, he could get in the passing lane and shut down the play.  No such luck for the Hawks, though.  Speed is so important, especially in the playoffs.

7.  Sullivan makes a perfect pass, forcing Neimi to shift from left to right quickly.  Legwand has half a net to shoot into, and he doesn't miss.  The result is a game winning goal, and 00:00:00 on the Legwand O'Meter.  Go Preds!

The Poll


Monday, January 11, 2010

AOAG: Defensive Breakdowns & Losing Your Man

PredNation,  tough loss for the good guys over the weekend.

Some PredBloggers, including a really hilarious blog in See Puck City, and a bunch of post-game tweeters, were up-in-arms over the defensive pairing of Dan Hamhuis (D, #2) and Kevin Klein (D, #8).  I didn't get to see the game myself, so I decided to devote an Anatomy of a Goal to one goal against this defensive duo.  My conclusion:  Hamhuis, Klein, and David Legwand (C, #11) get caught flat footed.  Who is most responsible?  Cast your vote in poll after the break.


In this edition of Anatomy of a Goal, lets look at how defensive breakdowns, and losing track of your man, can result in easy goals against.

Sunday, January 3, 2010

Anatomy of a Goal: Crisp Passing

PredNation!

Everyone raves about how the Predators are a hard working team.  Very true.  The Preds, however, are a really good passing team as well.  Who cares?  You do.  Well, crisp passes move faster than the fast skaters.  In this edition of Anatomy of a Goal, lets see how solid passing makes Preds' opponents look silly, in Arnott's game-winner.   Don't forget to vote at the bottom to let me know how impressive you think this play is.

[Need help with all the arrow's and circles and nonsense?  Check out the new AOAG Legend.]

The Breakdown: Four Passes, Eight Seconds, One Goal.

1. Shea Weber (D, #6) begins the play in the defensive zone, making the first pass ("Good Pass #1") to defensive partner Ryan Suter (D, #20).

2.  Patric Hornquist (RW, #27) breaks toward the top of the screen.  Hornqvist will fill the void created by the Anaheim player moving forward to forecheck Suter.


3.  Suter receives Good Pass #1, and waits until the defender is on top of him.  He then sends a long bomb pass ("Good Pass #2") down ice to Hornqvist.  Weber breaks quickly down ice.


4.  Good Pass #2 = Long Bomb to Hornqvist.  He does a great job of collecting the pass.
  

The star means this is the "Play of the Play", IMHO.  That means that it was this play that was the most crucial in setting up the goal.  


5.  Hornqvist also waits until the defender is on him, and then fires a hard, crisp, accurate pass.  This Good Pass #3 goes directly to the spot where Weber will be. Tape-to-tape.  Weber is full speed and catches the pass in stride.  


6.  The Anaheim defender moves up to make a play on Weber and the puck.  


7.  Because Weber receives Good Pass #3 at full speed, he is able to make a quick move and blow by the Anaheim defender.  Weber's speed forces the defender to turn around.  Thus, the Predators are able to enter the zone with speed, instead of dumping-and-chasing.


[Entering the zone with speed is critical to setting up the offense.  It is much easier than getting the puck deep and having to race behind the net to reestablish possession].


8.  Because of the speed of entering the zone, the both Anaheim defenders cheated toward Weber.  Weber makes the Good Pass #4 to Jason Arnott (C, 19).  Arnott has a direct shooting lane because both defenders played Weber.  Good Pass #4 is tape-to-tape, allowing Arnott to fire a quick wrist shot.


Good Pass #4 forces the Anaheim goalie to move quickly from his left to right.  Arnott's quick shot is able to go over the goalie's shoulder for the game winning goal.


The Video


The Poll


Friday, January 1, 2010

Side-by-Side Breakdown: Turnovers Below the Goal Line

Pred Nation,  Happy New Year!  Good win last night by the Predators.  Almost every PredBlog had a recap last night, so check them out on the blogroll.

Turnovers.  They will kill any team, including last night's opponents the Columbus Blue Jackets.  In this special edition of Anatomy of a Goal, let's do a Side-by-Side Breakdown to see how defensive turnovers by the Blue Jackets below the goal line resulted in two easy goals, a win, and two points, for the Predators.

The Breakdown

Thuresson's tying goal is on the left.  Legwand's OT game winner is on the right.


1. In both shots, the Columbus player has the puck against the boards in their own zone.  Both puckholders are being pressured by an aggressive Predator's forecheck.

2. In both cases, the Columbus player attempts a pass because of the pressure by the Preds' forecheck.
--On the left:  the player attemps to pass to a player behind him (and not to the player on the left of the screen).   This is a bad pass because, as we can see from the replay, the only person behind him is a Predator.
--On the right:  The pressure causes the Blue Jacket to get tripped up.  The player makes a pass while he is falling, which is good.  However, lets just say the pass was quite crisp and tape-to-tape.


3.  The bad pass results in a turnover.  Once each Predator gets the puck, he does a good job of making a quick pass.
--On the left: The turnover is relatively easy, as the Columbus player passes the puck directly to the Predator.  However, the active forecheck was what resulted in the Predator being in position to recieve the pass.
--On the right:  Joel Ward does an EXCELLENT job of fighting for this puck and creating the turnover.  Watch the replay and check it out.  What a player.  Once Ward is able, he quickly makes a pass.  (We've seen where this kind of grit scores Pred's goals before).


4.  The passes are both quick and to Preds standing wide open in the slot.  What a shooter's pipedream.  Both shots catch the Columbus goalie moving, and the shots are so close in that that goalie has no time to react.  Easy goals.

Conclusion & Video
What impresses me about these plays (and admittedly I did not get to watch the due to new year's eve festivities), is the aggressiveness of the Predators in forcing the turnovers.  These are not necessarily the prettiest goals.  These (especially Joel Ward's) are hard work goals.

Credit also belongs to the Columbus defense, who apparently are not the best at clearing men out of the slot. Keep in mind, however, that when the play is below the goal line, at least one defenseman usually is too, which means it is easier for a forward to creep in front of the net.  A quick play like this is very hard to defend against.  Here's to hoping that the Preds get to score alot more of these goals, and that they can limit their recent trend of sloppy turnovers as well.

Thuresson's Goal


Legwand's Goal

Wednesday, December 30, 2009

Anatomy of a Goal: Designed Plays = Game Winning Goals

Pred Nation!

I love this goal.   Seriously, I LOVE this goal.  We've previously looked individually at either when faceoff wins, or lack of defensive speed, results in goals.  This week's goal by J.P. Dumont is a perfect example of how a designed play can exploit them both, and, only nine seconds apart, result in a game winning goal.  So lets break down one heckuva game winner (and streak snapper) in this edition of AOAG.

[Note:  I'm going to try something new in this post and put the football analogies in brackets, that way people who want to read them can, but those who don't can easily skip over.  As always, questions, comments, etc. are welcomed at preds101@comcast.net, or on twitter @preds101].

The Goal


The Breakdown


1.  The play starts off in a seriously offensive formation.  Shea Weber (D, #6) and J.P. Dumont (RW, #71) are lined up far to the right of the faceoff... an aggressive move given the fact that the faceoff is in the defensive zone

[Football fans, this is an offensive formation because it allows for breakaways, but provides the goalie less protection.  A rough football analogy would be a spread offense.  A typical formation would have Weber directly behind the center taking the faceoff, and the right wing standing closer to the faceoff circle, either to the right or behind the winger].

2.  Notice where the feet are positioned relative to the hash-marks on the circles.  Jason Arnott's (C, #19), feet in the right red circle.  He is lined up on the mark, as close to the Blues player as possible.  Steve Sullivan, (LW, #26), on the other hand, is a foot off the mark.  This allows for Sully to move quickly, without getting tied up with the Blues defender.

[Think of the difference as a defenseive CB who lines up on the line for bump-and-run coverage, versus a cornerback who gives the WR a few yards.]

3.  Now the logic behind the initial formation unfolds.
A. Marcel Goc (C, #9) wins the faceoff, and passes it behind him to a "seemingly" empty space.
B. Sullivan moves toward the puck, unobstructed, to gain possession
C. Weber moves back in anticipation of a pass.
D. Dumont is off to the races down ice, down the right boards.
E. Arnott is breaking down ice down the left boards.


4. Weber gets the pass from the now obstructed Sullivan.  He will pull the puck from his backhand to his forehand to make the pass up to Dumont.  Dumont is wide open and moving up ice.   However, the Blues defender is following Dumont toward the right sideboards.

5. Notice how this play has left the left side of the ice cluttered with players, especially Blues players.  Meanwhile, the Preds, Puck, and Play are all moving toward the right and out of the zone.  Arnott has already slipped by his man, who was likely not expecting the player from that position to break out of the zone.


6.  Weber makes the pass to Dumont, who has plenty of room to maneuver.


7.  Dumont has the puck and speed for a two-on-two breakaway.  Even if nothing else happens, this is a great transition from defense to offense.

[Transitioning from defense-to-offense quickly and effectively is a critical but difficult-to-measure team skill.  Sort of akin to the ability to convert third downs, if your team can't do it, they are not going to win alot of games].

8.  Arnott has blown by the forwards, and is not manned up with the other Blues defenseman, Eric Brewer (D, #4).  He was so quick down ice that he is forced to slow down a touch to avoid being offsides.


8.1 (Oops, two "8"s, anyway, above...)  It's amazing to see on the video, but tough to see in the still frames:  Dumont really puts on a burst of speed here.  He decides to go toward the boards with the puck.  In doing so he gets the defender, Darryl Sydor, (D, 44, age 37) turned around.

[If Dumont didn't have that extra speed to get passed the Blues defender, Sydor, what you would have seen is Dumont dumping the puck into the zone deep, a.k.a. "dump-and-chase"].


9.  The speed burst gives forces Sydor to turn from skating backwards to skating forwards.  That move, plus Dumont's speed, will give Dumont a step on the defender.

10.  The other defender, Brewer, is still forced to respect Arnott, who is coming into the zone and trailing Dumont.  If it were not for Arnott, the defender would be able to make a more aggressive play on Dumont.


11.   Dumont's extra speed meant that the blues defender, Sydor, was unable to make a good play on the puck.  The speed also meant that the defender was in no position to take down Dumont with a body check.  Sydor's only remaining option?  To take a diving poke-check at the puck.  This is not a position the defender wants to be in.  Sure enough, the diving poke-check misses.

Additionally, Brewer, the lower defender, realizes his defensive partner is in trouble, and moves over to help on Dumont.


12.  Brewer is unable to get over in time.  Dumont has "built a wall" so that his body is positioned between himself and Brewer.  Dumont is able to get a shot off that isn't the best shot in the world, but it is a goal.  The game winner, no less.  Sydor can only look on and realize his lack of speed resulted in a goal.  Had it puck not gone in, Arnott was close behind to attempt to pick up the rebound.

Conclusion

What a fantastic play.  An important face-off win on a drawn up "get-down-ice-quick" play results in a great individual move and a goal.  Its these types of goals that are hard to appreciate full speed at the game, or on TV, but really give you a sense of how impressive the game is.  Until next time, lets go Preds!

Thursday, December 24, 2009

Anatomy of a Goal: Scoring Inside the Box

Merry Christmas Eve and Happy Holidays to everyone.  As you likely well know by now, Nashville didn't play the best game Tuesday in Vancouver.  Regardless, what would Christmas be with a new "Anatomy of a Goal" posting? Christmas as usual? That's right. As pretty as our NHL Star of the Week, Patric Hornquist's, goal was, that is not on tap today.  In today's AOAG, let's dig into the Preds stuggling penalty kill, as of late, to see what happens when the power play thinks (and scores) inside the box.

The Video


The Video Breakdown


1. The play starts on the powerplay, which the puck coming away from the net toward the blue line.  The predator penalty killers are pretty far out of position.  Instead of being in a "box" formation (see below for what a box looks like when they regroup), they somehow ended up lined up on the goal line.  Three words: OUT OF POSITION.


2. The puck comes back to the Vancouver defenseman in the high slot.  Predators forward Joel Ward (RW #29) is out of position, and is now scrambling toward the defenseman in order to prevent a play.


3. Ward slides on the ice to take away defenseman's shooting lane.

4.  The defenseman pauses as Joel slides on the ice.  Instead of taking the shot, he makes the pass to the winger at the top of the screen, who was previously covered by Ward.


5. Kevin Bieksa, (D, #3), at the top of the screen, gets the now has the puck, and Ward is trying to recover.  The Preds as a group are not in their box penalty kill formation (two forwards at the top, two defenseman near the net), but are all out of position.  Because of this, the winger has four options: (A) take the shot, with traffic in front of the net, (B) pass to the winger in the slot, (C) make the return pass to the defenseman in the high slot, (D) retreat to the point to set up a play.


6. Joel Ward returns gets up and returns to position to chase the puck carrier, but two other Predators also chase the puck carrier as well.  This means that three penalty killers are attacking the puck carrier, which is not a recipe for success on the penalty kill.

7. The good news is that aggressive play has eliminated options (A) - (C).  Bieksa, the Vancouver defender, now retreats to the blue line.


8.  The aggressive play by the Preds forwards, Ward and Legwand, has drawn them very high in the zone.  The Preds are so far apart that they are unable to get their sticks in the "passing lanes".  Thus, the Bieksa is able to make a cross-ice pass to a teammate, Daniel Sedin, in great position.


9.  The Predators are closer to returning to their box formation, however, the play is shifting toward the bottom of the screen, and the "box" is favoring the top.  Daniel Sedin recieves the pass, and quickly feeds it to his brother Henrik Sedin in the corner.  Daniel is standing in the middle of the box... a dangerous place if you are a preds fan.

(?).  What I am unsure of is whether the predators are still too high in the high slot, or are whether they should be closer to the net.  This is the difference between and active and passive penalty kill.  If the predators are lower in the box (closer to my dotted blue line) the pass would not have been completed.  However, if they were, it would be much easier for the Vancouver defenseman to pass the puck back and fourth, and also to take one-times from the blue line.   This is more of an interesting FYI than anything else, as I'm not necessarily sure the preds forward are to high in the zone (i.e. to the left of the screen).


10.  The Pred defenseman now breaks toward Henrik. This is the appropriate play.

11.  Unfortunately, because Ward was so high in the zone, Daniel is able to slip in underneath him and make a move to the net.  Henrik makes a great give-and-go pass back to Daniel.


12.  Daniel gets the puck inside of the Preds PK box, and the preds are unable to close on him in time.  With the traffic that has been in front of the net the entire time, in addition to the short range one timer, Ellis is unable to recover quickly enough.  Goal Vancouver.

Conclusion

This play started with scrambling penalty killers who were drawn too high in the zone, and as a result were never able to fully recover.  They let the enemy slip inside for a quick give-and-go score.  One the things the predators they can do to return to their penalty kill dominance is to be more disciplined on the kill.  It won't be  so easy with Jerred Smithson out of the lineup, here's to hoping.

Sunday, December 20, 2009

Anatomy of a Goal: Getting Seperation from Your Defender

Another amazing win for the Predators, puts them tied for first (and 1 1/2 games out of seventh?!) in the crazy Western Conference.  In this edition of Anatomy of a Goal, we'll examine the importance of offensive players' ability to separate from defenders (or as they'd say in football "create space").  On the Predator's first goal of the game, Jared Smithson's ability to separate sets up Martin Erat for a relatively easy first goal of the game.

Video Highlights


Video Breakdown


1. Red hot Martin Erat (Preds RW #10) and all-star defenseman Dion Phaneuf (Flames D #3) are chasing the puck into the corner.  Phaneuf (6'3'', 210 lbs.) is bigger and hits much harder than Erat.  Who, however, will be faster into the corner and around the boards?

2. Predators offensive players, including Jerred Smithson (#25) are breaking toward the net.


3. Erat's speed beats out Phaneuf.  Because Erat has half a step on Phaneuf, Phaneuf is not in a position to plaster Erat into the boards.

4.  Predators offenseive guys are still driving to the net.  Smithson is closer, but has a man on him.  He is going to find space by going to the net, backing up at a critical moment, as traced out by the dotted line.

5. This predator has a straight shot to the front of the net and takes it, in the hopes of tying up the defender there and getting traffic in front.


6.  Erat not only wins the footrace but is able to gain several steps on Phaneuf.  He is too far out to curl back toward the net to attempt a shot.  (For another look at why defensive speed is so important, check out the first "anatomy of a play" on why defensive speed is so important).

7.  Look at Smithson hit the breaks hard and start to inch backward toward the open whole where he used to be... sneaky sneaky.


8.  Erat waits until Phaneuf is almost on him, and the other Flame defender has moved futher toward the bottom of the screen.  This creates a great passing lane for Erat back to Hamhuis at the blue line.

9.  Look how much space is between Smithson and Phaneuf now.  I don't think Phaneuf knows he lost his man.


10.  Dan Hamhuis is wide open for the shot.  He takes it and fires at the net.


11.  The rebound pops out and Smithson is opportunistically right in front of it.  However, he has defenders closing fast, and the goalie would be in good position to make the save, despite the traffic in front.  Instead he will make the decision to make the quick pass to Erat.

12.  Now it is Erat who has found the open space, leaving Phaneuf a few feet lower closer to the net.


13.  Erat gets the quick pass and fires.  Phaneuf realizes he is out of position and breaks toward Erat, but its too late.  The goalie has to quickly move from his right to left, but it is also too late.  Goal Predators!

Wrap Up

Two keys to this play in my opinion.  First, the hard work and quick staking of Erat to get the puck in the corner and beat Phaneuf. Second, and probably more importantly, the ability of Smithson to find the whole in the defense and thus be open for an opportunistic pass.  That's all for this installment.  Lets' go Preds!

Friday, December 18, 2009

Anatomy of a Goal: Grit and Driving to the Net

A great win for the predators last night.  What I loved most about this game (besides the first period rally) is how similar and gritty almost every goal was.  Hard work, traffic in front of the net, and all of that good stuff.  A true team effort.  As Brandon Felder mentioned in a good piece of postgame analysis, two game ago the preds had seven different goal scorers.  Last night: five.  In this edition of "Anatomy of a Goal", lets examine Ryan Jones' prototypical goal, to see why hard work and traffic in front is the current key the Preds' scoring success.

Video Replay


Video Breakdown


1.  Ryan Jones (#28) and the Oiler defenseman are battling for position on the puck.  The Oiler defenseman has the slightest of edges, but nothing that Ryan can't overcome.
2. Once the puck crosses the blue line, Wade Belak (Preds #3) is free to drive down the middle (a.k.a. "the slot").  A defender is not immediately on him, so he will have an easy time doing so.


3. Belak is able to continue into the zone.  Because no defender is on top of him, he is able to stay parallel with the puck as it goes deeper into the zone.
4. Jones and the Defender are now in a full on battle for the puck.  Jones does an excellent job of using his body to attempt to out-muscle the Oiler.
5.  The other two oiler defenseman are in good position, letting the play come to them.  They could choose to be more agressive, but there is no need on this play.  It appears that the puck will continue harmlessly into the corner.

6.  Jones makes an amazing move with his stick right here.  Its so quick, its very easy to miss.  Jones uses stick to lift the defenders stick off of the puck.  Once that happens, Jones quickly lowers his own stick and makes a great pass to the open Belak (#3).


7. Seeing the pass (the puck is circled in black), the oiler defenseman collapse on Belak.  So now one defenseman is covering Jones, and two are covering Belak.  Nick Spaling (Preds #13) is all alone at the bottom of the screen.

8.  As Belak gets the puck, the defenseman who was guarding Jones follows the play, and now three Oilers are tracking Belak.  Keep in mind folks, Belak is our enforcer... not a goal scorer.   He is almost below the goal, and the puck is on his backhand.  The is able to get off a shot, but it is an incredibly low percentage shot.  The point is that having three Oilers responsible for him is too many, and someone(s) is letting their defensive assignment slip. Jones is uncovered, and Spaling is unnoticed.


9.  Now all four Oilers in the shot are watching Belak's low percentage shot, which has missed and is dangerously in front of the net.  The Oilers ALL have their back to the crashing Jones and Spaling.  Meanwhile, Jones and Spaling are driving to the net... hard.  The correct defensive play here would be for one of the Oilers to "Play the Man", and get in the way and stop Spaling and Jones from getting to the net.  However, the Oilers are instead "Playing the Puck", which means they are all looking for the puck so they can knock or pass it away from the goal.


10.  Belak's rebound is picked up by Jones, who is easily able to chip in puck.  Jones's shot is from just a few feet out, and no one touches him.  Goal!  Also, notice all the traffic around the Oiler goaltender.  It becomes very hard find the puck (much less save the puck) with that much traffic in front.

Wrap Up

What is great about this goal is that it shows that the Preds are fighting for the puck and are working hard to get to the net.  The first five predator goals of the game look almost idential to this one!  For highlgihts of those goals, click here.